
I’ve spoken before about my love for homemade jam, and how my father’s jams basically ruined me for all others. I used to love watching him putter about the kitchen, usually late at night, in the slow quiet stillness of the house, slicing fruit, measuring sugar or herbs and always giving me little jobs to help out with. We were both the most die-hard night owls; we still are. These nights we used to spend together cooking are among my all time favourite memories of growing up.
Even today, nighttime is still my favourite time to cook. As much as I enjoy it, it isn’t always possible to cook late at night of course…but when I do, I always think of my father and feel a familiar warmth and sense of connection to him, even though we are continents apart.


Of all the jams he used to make, my favourite was always apricot jam. I just LOVE the sweet and sour/tanginess it combines, and have been known to eat it straight-up with a spoon in times of desperation, no vehicle needed. Our wonderful resident cook also used to make a mean swiss roll with this jam, which was such a treat. I intend to get the recipe off her someday to share it with you guys.
Another remarkable jam my father used to make, and was actually quite famous for, was spiced date and clove jam. It is just the stuff dreams are made of. I often miss it and find myself craving it, but the heartbreaking problem is that it’s made with fresh, soft Egyptian dates called “ramly” dates, which sadly cannot be found here in Australia (I’ve actually never seen ANY kind of fresh dates here, which I don’t think I’ll ever get over).


So back to the apricots, which thankfully are just gorgeous down here. In fact, all the stone fruit here in Australia is blowing me away, reminding me of how stone fruit used to taste like in Egypt when I was a kid. They’re impossibly fragrant and sweet, and preserving them into jam is basically storing summer sunshine in jars, to be enjoyed throughout the year whenever the need for a little extra sunshine arises. Each year, I feel the familiar frantic urge to make as much as I possibly can before the season runs out, as it never feels like I have enough.
I made this batch, thinking it would last me several months, but it appears I can be rather delusional. We’ve finished more than half of it already, and show no signs of slowing down!


You could make the apricot and peach jams separately, like I did here, or you could do half and half of each fruit in the same batch, which is also beautiful. I personally prefer to have each flavour shine on its own, which tends to be a recurring theme in the way I cook/eat.
The apricots need no peeling, just a simple halving or quartering is all the prep you need to do…the peaches, however, do need to be peeled. Thankfully, there is a quick and simple way to get that done with minimal fuss and waste. All you need to do is make a shallow cross with a sharp knife in the bottom of each peach, then give them a quick dunk in a pot of boiling water for 30 seconds or so, followed by a dip in a bowl of cold water. The skin then slips right off in the easiest, most satisfactory manner imaginable…just like magic.

The addition of vanilla is optional, but strongly recommended. As I’ve discussed before when I told you about my plum jam, I use a very low sugar to fruit ratio compared to what most people/brands use. I find that about 250g of sugar per kilogram of fruit is more than enough; it’s just perfectly sweet without killing all the beautiful fruity flavour. It does however mean that this jam should be stored in the fridge, because the lack of sugar reduces its shelf life, as sugar acts as a preservative. A small price to pay for having such delicious (and healthier!) jams.
These jams are beautiful with croissants, crepes or stirred through yoghurt. They’re also incredible dolloped over labneh spread on toast, or even to top a cheesecake. They are pretty much the essence of summer in a jar, and I always intend to give some away as gifts, but the slightly embarrassing truth is that I usually end up keeping it all to my greedy self…and I’m not even sorry.


- • 1kg apricots or peaches, or half & half
- • 250g sugar
- • half a vanilla pod
- • juice of half a large lemon (or one small lemon)
- Prepare the fruit: The apricots only need to be pitted and halved or quartered. The peaches need to be peeled. To easily and quickly peel the peaches: bring a large pot of water to the boil. Make a shallow X in the bottom of each peach with a sharp knife. Drop the peaches into the boiling water and leave them for just 30-40 seconds, then remove them from the water and immerse them into a bowl of cold water. As soon as they are cool enough to handle, use your fingers to pull the skin off; it should peel right off very easily! Slice the peaches into 8ths and discard the pit (it can be a bit tricky to get rid of the pit, as it is usually really stuck to the flesh. What I do is cut off the cheeks of the peach like you would do a mango, then cut off the 2 parts on either side of the pit and discard it). Put the sliced fruit in a large pot and add the sugar. Toss to distribute the sugar through the fruit, cover the pot and leave it for about 30 minutes to allow the fruit to macerate and release its juices and the sugar to dissolve. Do not refrigerate.
- When you are ready to cook the jam, sterilise the jars you will be using to store the jam using your preferred method. I simply wash the jars and their lids with warm soapy water, rinse, then place the wet jars and their lids onto a baking tray lined with baking paper and place the tray in an oven preheated to 130 degrees C (270F) for at least 20 minutes; leave them in there while you make the jam, as you will need the jars to be hot once the jam is ready. This recipe yields about 600-750ml of jam so prepare enough jars accordingly.
- Make the jam: take the lid off the pot and place it on the stove on a low heat (DO NOT turn up the heat to high or you will scorch the bottom and burn the jam). Cook, stirring occasionally and gently, until a foam starts to form, about 10-15 minutes. Using a large spoon, skim as much foam as you can off the jam and discard. Don’t worry too much about getting all of it, just as much as you can manage.
- Add the seeds from the vanilla pod, along with the pod itself to get all the flavour out of it. Add the lemon juice, and cook for a further 10-15 minutes, stirring occasionally & gently, until the jam is slightly thickened and syrupy.
- IF USING JARS WITH METAL SCREW-TOP LIDS: While the jam is still hot, remove the jars carefully from the oven, making sure not to touch the insides of the jars or their lids, or you will introduce bacteria all over again. Ladle the hot jam into the hot jars, screw the lids on immediately and flip the closed jars upside down onto a tray and leave them to cool (you have to do this while the jam is super hot, so don’t wait till you’ve filled all the jars to start putting the lids on; close each jar quickly as you go). Once cooled completely, store the jars in the fridge* This method creates a tight seal and a vacuum which will mean the jam will last longer before spoiling.
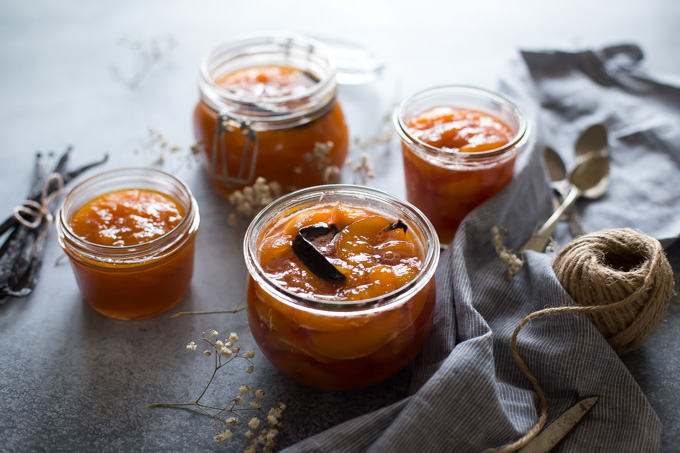
- IF USING FLIP-TOP JARS OR ONES WITH CLIP-ON GLASS LIDS (like the ones in my photos): While the jam is still hot, remove the jars carefully from the oven, making sure not to touch the insides of the jars or their lids, or you will introduce bacteria all over again. Ladle the hot jam into the hot jars and leave to cool completely before putting the lids on. Store in fridge.


